VRealize Automation 8.2 introduces an exciting new feature – the ability to provide Terraform as a service. It expands the vRA directory by adding cloud-based Terraform manifest templates. And Terraform adds an orchestrator, negotiation engine, and vRA lease management.
Preparing vRA
Official documentation for working with Terraform in vRA 8.3: How to include Terraform configurations in vRealize Automation Cloud Assembly .

The current implementation (vRA 8.2 and 8.3) runs Terraform on an external Kubernetes cluster. You can use any of the Kubernetes clusters already connected to vRA, or download the kubeconfig file of another cluster. Additionally, you need to specify the existing namespace for work and a link to the container image, in which all Terraform tasks will be executed.
Infrastructure -> Integrations -> Add integration -> Terraform Runtime
This cluster will be used for all vRA projects, only one Terraform Runtime instance can be configured .
Create a cloud Terraform template
We have already done integration with Yandex.Cloud using the orchestrator and Dymamic Types. Now let’s create a virtual machine in the Yandex cloud via Teffaform :
# main.tf
terraform {
  required_providers {
    yandex = {
      source   = "yandex-cloud / yandex"
    }
  }
}

variable "yc_token" {
  type         = string
  description = "Yandex Cloud API key"
}

variable "yc_region" {
  type         = string
  description = "Yandex Cloud Region (ie ru-central1-a)"
}

variable "yc_cloud_id" {
  type        = string
  description = "Yandex Cloud id"
}

variable "yc_folder_id" {
  type        = string
  description = "Yandex Cloud folder id"
}

variable "yc_vm_cpu" {
  type = string
  description = "Yandex Instance vCPU"
}

variable "yc_vm_ram" {
  type = string
  description = "Yandex Instance RAM"
}

provider "yandex" {
  token       = var.yc_token
  cloud_id    = var.yc_cloud_id
  folder_id   = var.yc_folder_id
  zone        = var.yc_region
}

resource "yandex_compute_instance" "vm" {
  name                      = "tf-vm-vra-01"
  allow_stopping_for_update = true

  resources {
    cores  = var.yc_vm_cpu
    memory = var.yc_vm_ram
  }

  boot_disk {
    initialize_params {
      image_id = "fd87va5cc00gaq2f5qfb"
    }
  }

  network_interface {
    subnet_id = data.yandex_vpc_subnet.subnet-1.id
    nat       = true
  }

  metadata = {
    ssh-keys  = "myuser:${file("./id_rsa.pub")}"
  }
}

data "yandex_vpc_subnet" "subnet-1" {
  name        = "default-ru-central1-a"
}

output "internal_ip" {
  value       = yandex_compute_instance.vm.network_interface.0.ip_address
}

output "external_ip" {
  value       = yandex_compute_instance.vm.network_interface.0.nat_ip_address
}
For this example to work, you need the id_rsa.pub file with a public SSH key. The allow_stopping_for_update = true property is required to be able to change the configuration of an instance without manually stopping it.

- Create a Terraform configuration, test it and upload it to the Git repository (GitHub, GitLab, Bitbucket). Do not load * .tfstate files, as this will result in an error during deployment;
- Connect this repository to the vRA project: Infrastructure> Connections> Integrations . When adding a repository, select the Terraform configurations type ;
- If there is no required version of Terraform in Infrastructure > Configure> Terraform Versions , add it yourself, there is no official support for versions 0.13 and older;
- In Design> Cloud Templates, create a new cloud template: New from> Terraform . In the template creation form, specify the connected repository, select the required commit and a subdirectory with Terraform configuration files.
All variables from manifests will be described in the template as input values. For secure storage of passwords and tokens, it is better to use the new Infrastructure> Administration> Secrets service . A new secret object has been created to access stored secrets from cloud templates :
    ....
    variables :
      yc_token : '$ {secret.YC_TOKEN}' ....
Terraform output parameters (output) will be available for use in expressions, they can be passed to the input of other resources: $ {resource.terraform.outputs.external_ip} .
When adding a Terraform Configuration resource to existing templates, you will have to configure its parameters and input values manually, so it is better to create a separate Terraform cloud template and copy the ready-made description with parameters from it.
Launch and execution control
Deployment is performed in the Kubernetes cluster as separate jobs (Job):
kubectl get all -n vra
NAME                                                    READY   STATUS    RESTARTS   AGE
pod/vra-tf-4814554a-8229-4eb9-9708-841d5c3b7fb5-ltq4v   1/1     Running   0          24s

NAME                                                    COMPLETIONS   DURATION   AGE
job.batch/vra-tf-4814554a-8229-4eb9-9708-841d5c3b7fb5   0/1           24s        24s
For each Terraform Configuration resource in the cluster, two tasks are sequentially created: to run terraform plan and terraform apply .
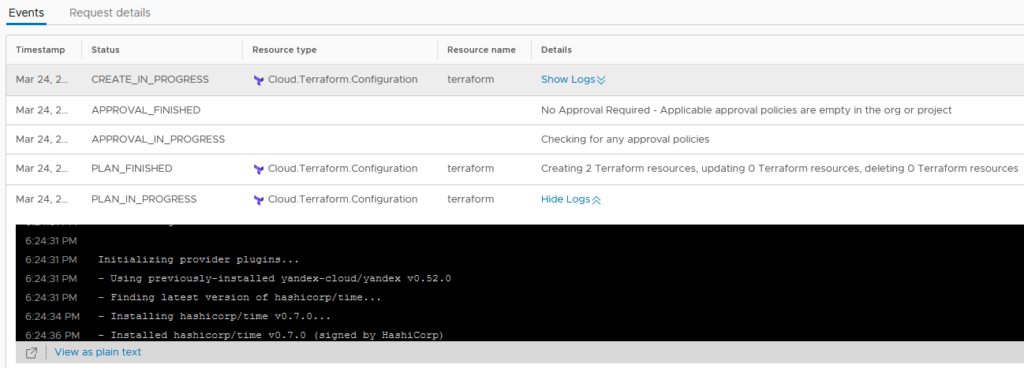
All events, as well as full logs of Terraform’s work, are available in deployment on the History tab. The Show Logs link will show the logs directly in the History tab, this is not very convenient, the View as plain text link will open them in a separate tab:
There are two actions available for a terraform object: Get Terraform State and Refresh Terraform State . On the template diagram, each resource from the Terraform configuration is represented by a separate element, for each of them you can see all the attributes.

Sometimes you need to change the deployment parameters, for example, add a vCPU or RAM to a virtual machine. The Update method allows you to edit the input values and trigger an update to the Terraform configuration.
Displaying cloud zones
There is another interesting option called “Display Cloud Zones for Terraform Resources”. This option allows you to allow access to already configured cloud zones within the vRA project.

When enabled, the credentials of associated cloud accounts will be securely passed to the Terraform launcher. You don’t need to provide credentials when creating a Terraform manifest:
provider "vsphere" {
  allow_unverified_ssl = true
}
In the cloud template, vRA will independently register a provider based on the available cloud zone:
providers:
  - name: vsphere
    # List of available cloud zones: vc.zabedu.ru/Datacenter:datacenter-31
    cloudZone: 'vc.zabedu.ru/Datacenter:datacenter-31'
Attention! vRA transfers credentials, but does not yet restrict the user to the limits of this cloud zone. For example, you limit the cloud zone to one vSphere cluster or one resource pool, but the credentials of the entire cloud account will be transferred to Terraform. By specifying another cluster or pool in the manifest, the user will have access to it and to all its resources! I do not recommend turning on the display of cloud zones without an urgent need, we are waiting for the next releases of vRA.
Brief summary
Pros of using Terraform in vRealize Automation 8:
- Provides the ability to expand the vRA catalog with services based on Terraform configurations;
- Allows you to hide the credentials of Terraform providers from users, giving them only the functionality described in the manifest and cloud template;
- The capabilities of Terraform are expanded due to vRA: it adds execution coordination, limiting the time of use, launching additional processes at various stages of work.
Cons of the service:
- No restrictions on user actions when using the display of cloud zones;
- Requires an external (to vRA) Kubernetes cluster with Internet access.
To work in a completely isolated environment:
- When configuring a K8S cluster, specify an image from the local registry;
- Upload the Terraform archive to your local server and change the link in the Terraform Versions settings ;
- Along with the manifests, upload the local directory with the providers ( terraform.d or .terraform depending on the version) to the Git repository , but this does not always work.
Translated by Google Translate